
How to take a perfect impression
At Bayshore Dental Studio, we believe in creating high quality and perfectly fitted prosthetic restorations. Without the patient in front of us, we must rely on impressions and models supplied by our dentists and their staff to dictate 90% of the manufacturing process. We have found that even the most experienced practitioner can encounter difficulties when making an impression. Even the slightest inaccuracy is amplified as the restoration progresses from model to wax/digital mock-up, to milling, to final seating. Here, we have listed 7 of the most frequently occurring impression-taking issues, their possible causes, and tips for taking perfect and accurate impressions. Use these tips to avoid costly and time-consuming remakes or adjustments to crown and bridge restorations. Follow these 7 steps on how to take a perfect impression:
1. Tearing/Rough Surfaces:
 Tearing on the margin of the preparation and poor lamination between the tray material and wash can be due to a number of causes. To avoid these issues, pay close attention to your retraction technique. In appropriate cases, consider using the two-cord technique. Additionally, pay close attention to the recommendations for the material’s oral working time. Set a timer to ensure the tray is left in the mouth for the full set time.
2. Tight crowns:
This problem can be caused by early removal of the impression tray from the mouth, a poor bond of the material to the tray, or seating an impression tray with material that is partially set. Closely follow the recommended working and setting times and always use a VPS tray adhesive according to instructions.
Call us at 877.954.6243
or send an Email
3. Short Crowns:
Trays with weak or low walls can provide insufficient support during impressioning, leading to short crowns. To address this issue, use custom or inflexible trays — preferably metal. Short crowns can also be due to teeth coming into contact with the tray, so confirm that teeth do not touch the tray.
4. Voids:
 On the margin of an impression, voids can compromise the restoration’s fit and function. If you experience this issue, your syringe technique may need improvement. Use a stirring motion while syringing, making sure to keep the syringe tip immersed to avoid trapping air. Air may become incorporated into the syringe while loading. To avoid this, front load the syringe by inserting the mix tip directly into the syringe and forcing the plunger backwards.
When voids occur on occlusal surfaces, they can lead to problems with articulation of stone models. Moisture present in the sulcus or pooled on occlusal surfaces is frequently the cause of the problem. To counter this issue, monitor for pools of water or saliva before inserting the impression tray. Control bleeding using the two-cord retraction technique and/or hemostatic agents as needed.
5. Tray Seating
The tray seating step presents the possibility for a number of errors.
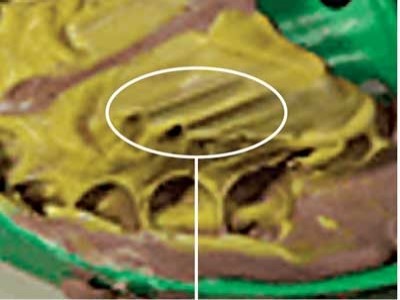
If ledges are an issue, try not to seat the tray too rapidly. Position the tray before seating, and use a slow, steady, vertical seating motion.

Tray seating — ledges
Drags can result when the tray is placed and seated in one motion. They can also occur when teeth rebound off the tray and slide into position. To avoid drags, carefully position it in the mouth before seating it slowly and carefully. Avoid contact of teeth with the tray.
 Tray seating — drags
Rocking crowns and slanted or wavy teeth can be caused by tray movement after seating. Use passive pressure on the tray to immobilize it for the full recommended oral set time.
6. Bite registration:
Poor interocclusal records can lead to excessive occlusal adjustment at restoration delivery. To combat this, use a dimensionally stable bite registration material. Ensure the model is trimmed properly. Additionally, monitor patients to confirm they do not move during the impression procedure.
7. Surface inhibition:
Surface inhibition can occur when impression material is exposed to air-inhibited methacrylates or residues from custom temporary materials. This results in surface of the impression material not setting properly, feeling tacky to the touch, and visually resembling the surface of an orange peel. Avoid this problem by waiting to fabricate the temporary crown until after the final impression has been made. Use an alcohol wipe to remove the air-inhibited layer on any composites, adhesives, or core buildups in the impressioning area. With a reliable impression material and proper technique, impression-taking can be predictable and highly accurate.
![]()
Quick Links
![]()
Company
![]()
Get In Touch
![]()